Notices
Series I Do It Yourself Forum Wanna save some coin or time/money in the shop? Read up on Do-It-Yourself custom mods and repairs & post your own here.

DIY: Installing Rotary Accents

Thread Tools
 
Search this Thread
 
Rate Thread
 
Old 05-08-2004, 10:55 PM
  #1  
Registered User
Thread Starter
 
RXDave's Avatar
 
Join Date: Apr 2004
Location: Cleveland
Posts: 38
Likes: 0
Received 0 Likes on 0 Posts
Installing Rotary Accents

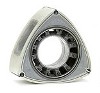
Here is a little how to on installing the rotary accents. I started with the rear as it was the easiest. Here is the rear kit. I used rubbing alchohol to clean the area.
Old 05-08-2004, 10:59 PM
  #2  
Registered User
Thread Starter
 
RXDave's Avatar
 
Join Date: Apr 2004
Location: Cleveland
Posts: 38
Likes: 0
Received 0 Likes on 0 Posts
Both accents are secured with double sided tape.
Old 05-08-2004, 11:00 PM
  #3  
Registered User
Thread Starter
 
RXDave's Avatar
 
Join Date: Apr 2004
Location: Cleveland
Posts: 38
Likes: 0
Received 0 Likes on 0 Posts
You get a packet of 3M primer to wipe down the area with after the alchohol.
Old 05-08-2004, 11:01 PM
  #4  
Registered User
Thread Starter
 
RXDave's Avatar
 
Join Date: Apr 2004
Location: Cleveland
Posts: 38
Likes: 0
Received 0 Likes on 0 Posts
Priming
Old 05-08-2004, 11:02 PM
  #5  
Registered User
Thread Starter
 
RXDave's Avatar
 
Join Date: Apr 2004
Location: Cleveland
Posts: 38
Likes: 0
Received 0 Likes on 0 Posts
After taking the backing off the tape apply the accent evenly.
Old 05-08-2004, 11:03 PM
  #6  
Registered User
Thread Starter
 
RXDave's Avatar
 
Join Date: Apr 2004
Location: Cleveland
Posts: 38
Likes: 0
Received 0 Likes on 0 Posts
Walla!
Old 05-08-2004, 11:04 PM
  #7  
Registered User
Thread Starter
 
RXDave's Avatar
 
Join Date: Apr 2004
Location: Cleveland
Posts: 38
Likes: 0
Received 0 Likes on 0 Posts
The front accent is very similar. The one difference is that it comes with two small black pegs to prevent it from coming off. Here is the front kit.
Old 05-08-2004, 11:08 PM
  #8  
Registered User
Thread Starter
 
RXDave's Avatar
 
Join Date: Apr 2004
Location: Cleveland
Posts: 38
Likes: 0
Received 0 Likes on 0 Posts
Here is a pic of how the tape is on the front accent. If you do not have the front air dam you need to double the tape (which is included) on the inside front. Since I have the normal front end I needed to use the extra tape.
Old 05-08-2004, 11:09 PM
  #9  
Registered User
Thread Starter
 
RXDave's Avatar
 
Join Date: Apr 2004
Location: Cleveland
Posts: 38
Likes: 0
Received 0 Likes on 0 Posts
Here is the front tape
Old 05-08-2004, 11:12 PM
  #10  
Registered User
Thread Starter
 
RXDave's Avatar
 
Join Date: Apr 2004
Location: Cleveland
Posts: 38
Likes: 0
Received 0 Likes on 0 Posts
After priming with the alchohol and the 3M primer, take the backing off the tape and carfuly push the accent into place. You might need to pick up the lip of the bumper a bit. When that is done take each of the black pegs and push them into place.
Old 05-08-2004, 11:12 PM
  #11  
Registered User
Thread Starter
 
RXDave's Avatar
 
Join Date: Apr 2004
Location: Cleveland
Posts: 38
Likes: 0
Received 0 Likes on 0 Posts
Here is the peg in place.
Old 05-08-2004, 11:15 PM
  #12  
Registered User
Thread Starter
 
RXDave's Avatar
 
Join Date: Apr 2004
Location: Cleveland
Posts: 38
Likes: 0
Received 0 Likes on 0 Posts
There you go! Mine needs a wash but you need to wait 24 hrs to let the tape set before getting it wet. (at least that's what the instructions say)
Old 05-08-2004, 11:17 PM
  #13  
Registered User
Thread Starter
 
RXDave's Avatar
 
Join Date: Apr 2004
Location: Cleveland
Posts: 38
Likes: 0
Received 0 Likes on 0 Posts
Smile

Here's a shot further away. Gotta change my signature now!
Old 05-09-2004, 12:02 PM
  #14  
DRIVEN
 
cgrx's Avatar
 
Join Date: Feb 2004
Location: Norcal
Posts: 2,053
Likes: 0
Received 0 Likes on 0 Posts
Thanks for the write up. Looks good.
I should be installing some in the near future
Old 05-09-2004, 12:07 PM
  #15  
Registered User
 
poolsidenaz's Avatar
 
Join Date: Mar 2004
Location: Phoenix, AZ
Posts: 613
Likes: 0
Received 0 Likes on 0 Posts
Hmmm. I can get the RA for $155. That'd be the most out of pocket if I could install them myself. Hmmmmm.
Old 05-09-2004, 02:29 PM
  #16  
Registered
 
Omicron's Avatar
 
Join Date: Oct 2001
Location: Boulder County, Colorado
Posts: 7,966
Likes: 0
Received 4 Likes on 3 Posts
Nice little DIY, RXDave! I'm moving this to the DIY section, congrats! :D
Old 05-31-2004, 12:42 AM
  #17  
Hubble has been saved!
 
msrecant's Avatar
 
Join Date: Aug 2003
Location: Richmond, VA
Posts: 1,221
Likes: 0
Received 0 Likes on 0 Posts
Excellent DIY. I could have used it when I installed my rear accent.
Old 06-01-2004, 11:30 PM
  #18  
Goh Mifune
 
MEGAREDS's Avatar
 
Join Date: Sep 2003
Location: Green Oaks, IL
Posts: 850
Likes: 0
Received 0 Likes on 0 Posts
Thanks! Simple, but there's nothing like photos to prove it.
Old 06-13-2004, 11:13 AM
  #19  
Bigus Rotus
iTrader: (3)
 
Nemesis8's Avatar
 
Join Date: Jun 2004
Location: Missouri
Posts: 8,573
Likes: 0
Received 1 Like on 1 Post
Where do you get them for $155 ?? I found them for $120.60 here:

http://www.finishlineperformance.com..._exterior.html

Last edited by Nemesis8; 06-13-2004 at 11:43 AM.
Old 06-27-2004, 05:35 PM
  #20  
Registered User
 
Jeffjett's Avatar
 
Join Date: Jun 2004
Location: So. Cal.
Posts: 325
Likes: 0
Received 0 Likes on 0 Posts
Great lookin 8 Dave. I love the color. You guys that take the time to take digital pics of the stuff you install are truly awesome. Very helpful and considerate.
Old 07-05-2004, 01:44 PM
  #21  
Registered User
 
rotaryengine's Avatar
 
Join Date: Jul 2004
Location: Luxembourg (europe)
Posts: 34
Likes: 0
Received 0 Likes on 0 Posts
Great looks very goog & thanks a lot for the pics!!!!
Old 07-10-2004, 12:23 PM
  #22  
Registered
 
Rizim's Avatar
 
Join Date: Jun 2004
Location: Miami, FL
Posts: 27
Likes: 0
Received 0 Likes on 0 Posts
Awesome DIY! Took me 10 minutes to install both of them thanks to the pictures.
Old 09-18-2011, 10:00 PM
  #23  
The Turk
 
stragox's Avatar
 
Join Date: Sep 2008
Location: Orange, CA
Posts: 27
Likes: 0
Received 0 Likes on 0 Posts
I apologize for reviving an old post but is there anyway for you to repost the pics for the DIY RXDave? I just bought a used front rotary accent, it did not come with any screws or pegs as you mentioned and no double sided tape. So I am not very sure of how to tape this thing right to the bumper.

Thanks in advance!

Cheers
Old 04-04-2013, 08:27 AM
  #24  
Registered
 
Glenn09's Avatar
 
Join Date: Jul 2012
Posts: 35
Likes: 0
Received 0 Likes on 0 Posts
i have the same problem as stragox. i just bought the set of rotary accents but mine came with the double sided tape but no pegs or screws... is the double sided tape really enough? i'd like to get the screw/pegs on the front part but i dont think there is anything besides double sided tape that can be used for the rear accent. help!
Old 04-06-2013, 11:02 AM
  #25  
Wheels, not rims!!
iTrader: (8)
 
SayNoToPistons's Avatar
 
Join Date: Apr 2005
Location: LA
Posts: 6,527
Received 67 Likes on 56 Posts
^ Yes it is enough.


You have already rated this thread Rating: Thread Rating: 0 votes,  average.

Quick Reply: DIY: Installing Rotary Accents


All times are GMT -5. The time now is 03:11 PM.