DIY: How to Vinyl Wrap - Yourself.
 08-26-2011, 11:01 PM
#1
Living is best Modified.
Thread Starter

DIY: How to Vinyl Wrap - Yourself.
---:WARNING: This is a DIY in progress.
It is not finished. Information may change over time, modifications, corrections, editions will happen. Please keep this in mind while reading, planning or commenting.
Readers and all Guests: Please comment. Your Advice, information, experience, your homework around WILL help me and I'm sure anyone else interested in Vinyl Wrap.
__________________________________________________ __
I do not take responsibility if you scratch or damage your paint.
I can not stress this enough: you run a seriously real risk in damaging your paint in doing this DIY if unprepared. Still, no risk - no reward! Anyways, you can always repair and repaint a car back to stock.
It's time to tell you a story, about seeing the car of your dreams - but it's the WRONG color. You've been there. Sitting in the dealership, haggling with the dealer that "It's not the right color". In the end, you swallow your pride, and take that bright neon green corolla. Mine was tan. I preferred a Forest Green one. Anyways. Again! My Aurora Blue RX-8 is well.. not the color I wanted. I was looking for a black RX-8, Brilliant Black or better - BlackCherry. Oh yeah!
So After having the front bumper one shade of Aurora Blue, and the rear bumper another shade of Aurora Blue; I've come to the decision to take my car back. It looks horrible. Workmanship on the front bumper is better, but still is off. So I began talking to friends, people that work in the painting of cars. Being me, I don't like not doing things myself. Enter Vinyl. I was interested in getting my paint to look stock, really Aurora Blue and not Off Shades. Somehow or another I mentioned stickers, and Greg mentioned why not get a "giant sticker". This is where I remember thinking about Duct Tape cars... not a great image. Greg said I should do my research and think about it... So here I am after a month of research and looking and reading... this is my guide. My knowledge about Vinyl Wrapping, for everyone.
The great thing about this is that Vinyl, in the clear form acts as a clear protective bra for factory paint. You know those wonderful rocks and bird crap that etch your paint. Yeah, that's something you can do yourself instead of paying someone.
We've got a few choices:
1. Paint the entire car.
Pros: 1) Permanent. 2) Same color throughout the body 3) Able to be polished and shined 4) Looks great in all ways. 5) That Wet look is easy.
Cons: 1) Permanent. 2) depends on the workmanship 3) Very expensive 4) Workmanship and Budget go hand in hand 5) Can drasticly decrease resale value 6) Takes a lot of preparation (More money) to do it right. 7) If it's a daily driver, you'll need transportation. 8) Time to do an extensive, detailed paint scheme will be higher and may need air brushing. 9) Can be very toxic
2. Paint one part at a time.
Pros: 1) Permanent 2) Cheaper than shooting the entire car one color 3) less time is needed to prepare 4) Body panels can be taken off and the car can be driven 5) No rental needed.
Cons: 1) Permanent, depends on the workmanship, May decreases the look of a car if the paint is not matched perfectly, Hard to replicate factory paint (flakes, especially), Time spent is decreased for a part which may decrease workmanship. Parts tend to go unpainted for a long time, looking horrible.
3. Vinyl Wrapping.
Pros: 1) Not Permanent (read below). 2) Easy to work with medium. It can be pushed, pulled, heated, poked, cut, shaped and molded all without breaking the vinyl. It's very forgiving to work with. 2) Cheaper than painting the entire car and can be done at a fraction of the cost. can be done at a fraction of the cost which will help to speed up the color process. 4) Protects paint from bugs, small rocks, scratches. 5) Because it's not permanent, it protect the car's worth overtime - all the while changing the look of the car. 6) Can be done at home, with every-day objects. 7) Does not require a respirator. 8) Much more cost effective than painting a car for a business. 9) Vinyl designs can exceed what painting and air brushing can do - at a fraction of the time 10) Time. 2 days for a professional crew to do an entire car from scratch.
Cons: 1) Not Permanent (read below). 2) Workmanship matters: Preparation, Patience and Tools. 3) May cause paint damage. 4) It's a giant sticker, if inspected close enough, seams will be found. 5) Most people will not know how to take care of vinyl in an auto store - it's not something that's common. 6) Not a lot of people will do this themselves. 7) Can be very difficult to remove.
Bottomline: Vinyl is a much cheaper alternative than painting. Essentially it's the act of putting large, paint safe stickers to a vehicle. Known by other names: Auto Wraps, Car Wraps, Vinyl Graphics, Vehicle Graphics, Custom Vinyl Graphics, Vinyl Vehicle Graphics, Fleet Graphics, Vinyl Car Graphics. It also helps to protect the paint under the vinyl from rocks, scratches, etc. This option didn't really dawn on me until I seen the "Matte Blue" color on the internet. Seeing the transformation amazed me. And all done by one man. You know I'm not going to be shy about that!
The best thing about Vinyl is that it's a DIY thing - Solo. It's a stretch (pun not intended), but it can be done. While Vinyl wrapping is still expensive (Prices 28.99 to 1000+), you can get your car your color much faster than waiting to paint which may be 2x to 4x expensive.
I've tried to include instructions for those that are also intrested in buying services for Vinyl wrapping. Mostly because I know not everyone will want to do this themselves - and that's okay.
Everything I type here is meant as a starting point. Not the "be all" guide. Technologies in car wrapping include "Knifeless Tape", Vinyl with Air release, Longer lasting, cheaper vinyl. Please watch videos, read articles, and more. I've tried to make my DIY current as of 2011. I am NOT a professional at car wrapping.
[|||||||||||||||||] A0. INTRODUCTION \\\\\\\\\\\\\\\\\\\\\\\\\\\\\\\\\\\\\\\\\\
When it comes to my cars. I'm very peculiar about what happens, who touches, how it's done. Wrapping your car is much like ripping your engine out of the car without doing any homework. If done without proper care, you run the risk of vinyl lifting, peeling, tearing, bubbling. Worse still, you may damage your paint underneath. I'm writing this DIY in hopes that you too also care about what you drive, i've been researching, planning, reading forums
Let's face it, when it comes to modifications - the sky is the limit. There's also the monetary limit. Skill can be forged from the fires of learning. I will make mistakes. I don't have a doubt. I am not a professional. I do not do this as a profession, or even as a hobby on other people's vehicles.
Information that you should know before going further:
A0.1. LifeSpan: Typical lifespan of a car wrap is 3-5 years. For a more permanent solution find higher-year rated material: 5-7. Wrap can be extended if a car is left protected from the sunlight.
A0.2. Manufacturers:The better manufacturers of Vinyl- in order: 3m, Avery and Oracal
-- A0.2.1. Stay away from "Arlon" and "MACtac".
-- A0.2.2. Not all Vinyl is created equal.
-- A0.2.3. Even services may be limited to how much you can put towards the budget.
-- A0.2.4. Cheap Vinyl can speed up vinyl degridation by cracking, fading, peeling, distorting, sliding. Cheap vinyl will make removing it more difficult.
-- -- ● Intermediate: Lower-quality vinyl. More used as signs and not recommended for cars.
-- -- ● Performance: Vinyl are made better, last longer, easier to cut and shape.
-- A0.2.5. The Bottom line: Professional installers all have their favorite vinyl makers. All Makers also have garbage vinyl that the professionals won't touch. Each Vinyl has it's Pros and Cons.
A0.3. Protection: For cars that are outside (like mine)- Car Covers are recommended to help extend the life of the vinyl by decreasing sun exposure.
A0.4. Vinyl Cuts: Measurements are usually measure in "Inches by Yards". Vinyl is cut to yards. for vinyl used in large-scale installs: Limos, Buildings, Walls, floors.
-- A0.4.1. There's 36 inches per 1 yard: 12 inches = 1 foot. 3 feet = 1 yard.
-- -- -- -- Example: (24" x 50 yds) = (24 In x 1800 In)
A0.5. Rocks, Dirt, Bugs:Expect unfixed scratches and other paint blemishes to show up. Wash your car clean, clay bar it as well. Then, Repair them using Rock and Chip repair systems. [See More: "Rock Chip... Help"]
A0.6. Ruined Paint Finishes. It's been noted, by many "car wrappers" that - Yes. You can ruin the paint finish. I must stress that MOST, 99% of the factory finishes are kept in tact. Most of the paint issues come up by aftermarket paint - not factory. Poor, or lazy finishes by painters can cause paint problems when uninstalling Vinyl.
A0.7. Insurance Polcies: The color of the car is inside each car's serial number. The insurance companies look at the serial number of the car, that's it. If the body color is changed, it will not have an effect on the insurance policy. A factory red car, painted and/or vinyl to a different color will still be charged as a "Red" car. I talked with several insurance agents, but i urge you to talk with your agent to see if your policy would be affected.
A0.8. CarFax Reports: The body change may also be recorded as a body color change for CarFax Reports. I doubt it would be affected if you had Vinyl - it can come off.
A0.9. Prices:
-- A0.9.1. I received for my RX-8 Price quote: $2600
-- A0.9.2. Nationally, Prices you can expect for quality work: $2500 to $3000
-- A0.9.3. Prices for the materials range widely.
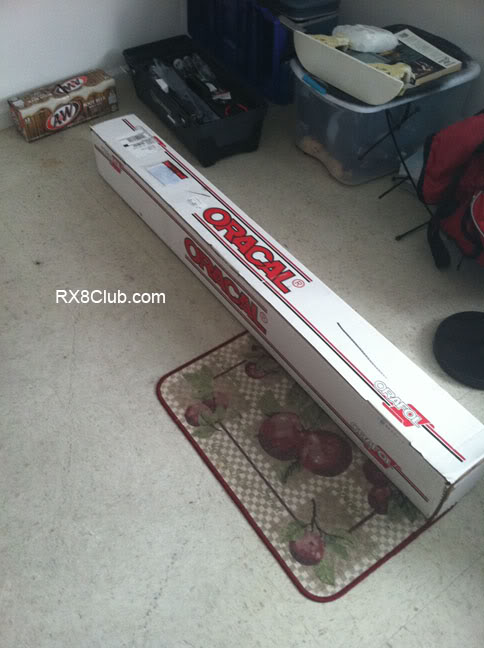
-- A0.9.4. Vinyl costs a lot to ship. It's Big, awkward to carry and may be heavy. I mean look at it!:
[|||||||||||||||||] A1. WRAP PROVIDERS \\\\\\\\\\\\\\\\\\\\\\\\\\\\\\\\\\\\\\\\\\
Not everyone will be interested in doing their own cars. Yes, you save A LOT of money to do it yourself and also claim bragging rights. Not everyone has the tools, the time, or the patience but still want their car wrapped. This should help you out.
It's easiest to locate providers close by. It may also be cheaper - but cheaper isn't always better.
A1.1: Car Wrapping Services:
-- A1.1.1. Fellers - 1 (800) 654-8405 - 7am-7pm M-F CST
-- A1.1.1. SkinzWraps - Dallas, TX: 214.741.4529 / Florida: 954.330.4680 / Los Angeles, CA: 310.593.4784 / New York City, NY: 646.825.0572 / Mooresville, NC: 704.858.4504 / Rome, Italy: +39 346 8577577
-- A1.1.2. DecalFX.com - No Phone Number Available
A1.2: Questions you should ask when you call for car wrapping services:
-- A1.2.1. Workmapship Warranty.
-- A1.2.2. Material used. 3m and Avery are the top vinyl manufacturers
-- A1.2.3. Material Warranty. How many years before my vinyl fades? Cracking? Peeling?
-- A1.2.4. Portfolio. Past cars they've worked on.
-- A1.2.5. Cost. Do I get charged for someone to look at my vehicle? How much for problems in the future? Charge per hour?
-- A1.2.6. Time. How long will my car be in your hands?
-- A1.2.7. Transportation. Is a rental covered?
-- A1.2.8. Removing Vinyl cost. Vinyl may last years, but eventually you'll probably want it to come off. How much will that cost you?
-- A1.2.9. Seamless Converage. Seams make the vinyl work cheap, and much easier to fall apart and tear with the wind and rain. Seamless push the edges of the vinyl into the seams of the car, Hiding the edges and making it appear like the car was painted. Do they attempt to hide the seams? Do they seam with the weather or against the rain?
[|||||||||||||||||] A2. TERMINOLOGY \\\\\\\\\\\\\\\\\\\\\\\\\\\\\\\\\\\\\\\\\\
Relief Cuts - Cuts that allow the vinyl to bend around objects, or conform easier to a shape.
Registration - The act of lining up sections of vinyl panels together so it's one consistant picture.
Weeding - ???
[|||||||||||||||||] A3. LEARNING \\\\\\\\\\\\\\\\\\\\\\\\\\\\\\\\\\\\\\\\\\
(Under Construction)
A3.1: RX-8 Club Threads
-- A3.1.1: Link - "DIY: Dry CF Console Side Plate Wrap" by Vlaze
A3.2: External Forums and Websites
A3.3: Videos
A3.4: Car Wrap Training
-- A3.4.1: Feller's Wrap Training Companies.
It is not finished. Information may change over time, modifications, corrections, editions will happen. Please keep this in mind while reading, planning or commenting.
Readers and all Guests: Please comment. Your Advice, information, experience, your homework around WILL help me and I'm sure anyone else interested in Vinyl Wrap.
__________________________________________________ __
I do not take responsibility if you scratch or damage your paint.
I can not stress this enough: you run a seriously real risk in damaging your paint in doing this DIY if unprepared. Still, no risk - no reward! Anyways, you can always repair and repaint a car back to stock.
It's time to tell you a story, about seeing the car of your dreams - but it's the WRONG color. You've been there. Sitting in the dealership, haggling with the dealer that "It's not the right color". In the end, you swallow your pride, and take that bright neon green corolla. Mine was tan. I preferred a Forest Green one. Anyways. Again! My Aurora Blue RX-8 is well.. not the color I wanted. I was looking for a black RX-8, Brilliant Black or better - BlackCherry. Oh yeah!
So After having the front bumper one shade of Aurora Blue, and the rear bumper another shade of Aurora Blue; I've come to the decision to take my car back. It looks horrible. Workmanship on the front bumper is better, but still is off. So I began talking to friends, people that work in the painting of cars. Being me, I don't like not doing things myself. Enter Vinyl. I was interested in getting my paint to look stock, really Aurora Blue and not Off Shades. Somehow or another I mentioned stickers, and Greg mentioned why not get a "giant sticker". This is where I remember thinking about Duct Tape cars... not a great image. Greg said I should do my research and think about it... So here I am after a month of research and looking and reading... this is my guide. My knowledge about Vinyl Wrapping, for everyone.
The great thing about this is that Vinyl, in the clear form acts as a clear protective bra for factory paint. You know those wonderful rocks and bird crap that etch your paint. Yeah, that's something you can do yourself instead of paying someone.
We've got a few choices:
1. Paint the entire car.
Pros: 1) Permanent. 2) Same color throughout the body 3) Able to be polished and shined 4) Looks great in all ways. 5) That Wet look is easy.
Cons: 1) Permanent. 2) depends on the workmanship 3) Very expensive 4) Workmanship and Budget go hand in hand 5) Can drasticly decrease resale value 6) Takes a lot of preparation (More money) to do it right. 7) If it's a daily driver, you'll need transportation. 8) Time to do an extensive, detailed paint scheme will be higher and may need air brushing. 9) Can be very toxic
2. Paint one part at a time.
Pros: 1) Permanent 2) Cheaper than shooting the entire car one color 3) less time is needed to prepare 4) Body panels can be taken off and the car can be driven 5) No rental needed.
Cons: 1) Permanent, depends on the workmanship, May decreases the look of a car if the paint is not matched perfectly, Hard to replicate factory paint (flakes, especially), Time spent is decreased for a part which may decrease workmanship. Parts tend to go unpainted for a long time, looking horrible.
3. Vinyl Wrapping.
Pros: 1) Not Permanent (read below). 2) Easy to work with medium. It can be pushed, pulled, heated, poked, cut, shaped and molded all without breaking the vinyl. It's very forgiving to work with. 2) Cheaper than painting the entire car and can be done at a fraction of the cost. can be done at a fraction of the cost which will help to speed up the color process. 4) Protects paint from bugs, small rocks, scratches. 5) Because it's not permanent, it protect the car's worth overtime - all the while changing the look of the car. 6) Can be done at home, with every-day objects. 7) Does not require a respirator. 8) Much more cost effective than painting a car for a business. 9) Vinyl designs can exceed what painting and air brushing can do - at a fraction of the time 10) Time. 2 days for a professional crew to do an entire car from scratch.
Cons: 1) Not Permanent (read below). 2) Workmanship matters: Preparation, Patience and Tools. 3) May cause paint damage. 4) It's a giant sticker, if inspected close enough, seams will be found. 5) Most people will not know how to take care of vinyl in an auto store - it's not something that's common. 6) Not a lot of people will do this themselves. 7) Can be very difficult to remove.
Bottomline: Vinyl is a much cheaper alternative than painting. Essentially it's the act of putting large, paint safe stickers to a vehicle. Known by other names: Auto Wraps, Car Wraps, Vinyl Graphics, Vehicle Graphics, Custom Vinyl Graphics, Vinyl Vehicle Graphics, Fleet Graphics, Vinyl Car Graphics. It also helps to protect the paint under the vinyl from rocks, scratches, etc. This option didn't really dawn on me until I seen the "Matte Blue" color on the internet. Seeing the transformation amazed me. And all done by one man. You know I'm not going to be shy about that!
The best thing about Vinyl is that it's a DIY thing - Solo. It's a stretch (pun not intended), but it can be done. While Vinyl wrapping is still expensive (Prices 28.99 to 1000+), you can get your car your color much faster than waiting to paint which may be 2x to 4x expensive.
I've tried to include instructions for those that are also intrested in buying services for Vinyl wrapping. Mostly because I know not everyone will want to do this themselves - and that's okay.
Everything I type here is meant as a starting point. Not the "be all" guide. Technologies in car wrapping include "Knifeless Tape", Vinyl with Air release, Longer lasting, cheaper vinyl. Please watch videos, read articles, and more. I've tried to make my DIY current as of 2011. I am NOT a professional at car wrapping.
Originally Posted by Menu so far
Menu:
-- A. Preface:
-- -- A0. Introduction
-- -- A1. Wrap Providers
-- -- A2. Terminology
-- -- A3. Learning
-- -- -- A3.1 LikeRx8club Theads
-- -- -- A3.2 Forums & Websites
-- -- -- A3.3 Videos
-- -- -- A3.4 Car Wrap Training
_____________________
-- B. Do it yourself: Preparation
-- -- B1. Examining The Car
-- -- -- B1.1 Panel Sizes
-- -- -- B1.2 Mathmatics
-- -- B2. Vinyl Shopping
-- -- -- B2.1 Online Stores
-- -- -- B2.2 Questions to ask
-- -- -- B2.3 Shipping and Handling
-- -- B3. Tools Needed
-- -- -- B3.1 Basic Tools - Beginners
-- -- -- B3.2 Intermediate - Do it Yourselfer
-- -- -- B3.3 Expert - Professional Grade
-- -- -- B3.4 My Tools - Ghetto
_____________________
-- C. Wrapping:
-- -- C1. Hints
-- -- C2. Final Preparation
[|||||||||||||||||] A0. INTRODUCTION \\\\\\\\\\\\\\\\\\\\\\\\\\\\\\\\\\\\\\\\\\
When it comes to my cars. I'm very peculiar about what happens, who touches, how it's done. Wrapping your car is much like ripping your engine out of the car without doing any homework. If done without proper care, you run the risk of vinyl lifting, peeling, tearing, bubbling. Worse still, you may damage your paint underneath. I'm writing this DIY in hopes that you too also care about what you drive, i've been researching, planning, reading forums
Let's face it, when it comes to modifications - the sky is the limit. There's also the monetary limit. Skill can be forged from the fires of learning. I will make mistakes. I don't have a doubt. I am not a professional. I do not do this as a profession, or even as a hobby on other people's vehicles.
Information that you should know before going further:
A0.1. LifeSpan: Typical lifespan of a car wrap is 3-5 years. For a more permanent solution find higher-year rated material: 5-7. Wrap can be extended if a car is left protected from the sunlight.
A0.2. Manufacturers:The better manufacturers of Vinyl- in order: 3m, Avery and Oracal
-- A0.2.1. Stay away from "Arlon" and "MACtac".
-- A0.2.2. Not all Vinyl is created equal.
-- A0.2.3. Even services may be limited to how much you can put towards the budget.
-- A0.2.4. Cheap Vinyl can speed up vinyl degridation by cracking, fading, peeling, distorting, sliding. Cheap vinyl will make removing it more difficult.
-- -- ● Intermediate: Lower-quality vinyl. More used as signs and not recommended for cars.
-- -- ● Performance: Vinyl are made better, last longer, easier to cut and shape.
-- A0.2.5. The Bottom line: Professional installers all have their favorite vinyl makers. All Makers also have garbage vinyl that the professionals won't touch. Each Vinyl has it's Pros and Cons.
A0.3. Protection: For cars that are outside (like mine)- Car Covers are recommended to help extend the life of the vinyl by decreasing sun exposure.
A0.4. Vinyl Cuts: Measurements are usually measure in "Inches by Yards". Vinyl is cut to yards. for vinyl used in large-scale installs: Limos, Buildings, Walls, floors.
-- A0.4.1. There's 36 inches per 1 yard: 12 inches = 1 foot. 3 feet = 1 yard.
-- -- -- -- Example: (24" x 50 yds) = (24 In x 1800 In)
A0.5. Rocks, Dirt, Bugs:Expect unfixed scratches and other paint blemishes to show up. Wash your car clean, clay bar it as well. Then, Repair them using Rock and Chip repair systems. [See More: "Rock Chip... Help"]
A0.6. Ruined Paint Finishes. It's been noted, by many "car wrappers" that - Yes. You can ruin the paint finish. I must stress that MOST, 99% of the factory finishes are kept in tact. Most of the paint issues come up by aftermarket paint - not factory. Poor, or lazy finishes by painters can cause paint problems when uninstalling Vinyl.
A0.7. Insurance Polcies: The color of the car is inside each car's serial number. The insurance companies look at the serial number of the car, that's it. If the body color is changed, it will not have an effect on the insurance policy. A factory red car, painted and/or vinyl to a different color will still be charged as a "Red" car. I talked with several insurance agents, but i urge you to talk with your agent to see if your policy would be affected.
A0.8. CarFax Reports: The body change may also be recorded as a body color change for CarFax Reports. I doubt it would be affected if you had Vinyl - it can come off.
A0.9. Prices:
-- A0.9.1. I received for my RX-8 Price quote: $2600
-- A0.9.2. Nationally, Prices you can expect for quality work: $2500 to $3000
-- A0.9.3. Prices for the materials range widely.
-- A0.9.4. Vinyl costs a lot to ship. It's Big, awkward to carry and may be heavy. I mean look at it!:
[|||||||||||||||||] A1. WRAP PROVIDERS \\\\\\\\\\\\\\\\\\\\\\\\\\\\\\\\\\\\\\\\\\
Not everyone will be interested in doing their own cars. Yes, you save A LOT of money to do it yourself and also claim bragging rights. Not everyone has the tools, the time, or the patience but still want their car wrapped. This should help you out.
It's easiest to locate providers close by. It may also be cheaper - but cheaper isn't always better.
A1.1: Car Wrapping Services:
-- A1.1.1. Fellers - 1 (800) 654-8405 - 7am-7pm M-F CST
-- A1.1.1. SkinzWraps - Dallas, TX: 214.741.4529 / Florida: 954.330.4680 / Los Angeles, CA: 310.593.4784 / New York City, NY: 646.825.0572 / Mooresville, NC: 704.858.4504 / Rome, Italy: +39 346 8577577
-- A1.1.2. DecalFX.com - No Phone Number Available
A1.2: Questions you should ask when you call for car wrapping services:
-- A1.2.1. Workmapship Warranty.
-- A1.2.2. Material used. 3m and Avery are the top vinyl manufacturers
-- A1.2.3. Material Warranty. How many years before my vinyl fades? Cracking? Peeling?
-- A1.2.4. Portfolio. Past cars they've worked on.
-- A1.2.5. Cost. Do I get charged for someone to look at my vehicle? How much for problems in the future? Charge per hour?
-- A1.2.6. Time. How long will my car be in your hands?
-- A1.2.7. Transportation. Is a rental covered?
-- A1.2.8. Removing Vinyl cost. Vinyl may last years, but eventually you'll probably want it to come off. How much will that cost you?
-- A1.2.9. Seamless Converage. Seams make the vinyl work cheap, and much easier to fall apart and tear with the wind and rain. Seamless push the edges of the vinyl into the seams of the car, Hiding the edges and making it appear like the car was painted. Do they attempt to hide the seams? Do they seam with the weather or against the rain?
[|||||||||||||||||] A2. TERMINOLOGY \\\\\\\\\\\\\\\\\\\\\\\\\\\\\\\\\\\\\\\\\\
Relief Cuts - Cuts that allow the vinyl to bend around objects, or conform easier to a shape.
Registration - The act of lining up sections of vinyl panels together so it's one consistant picture.
Weeding - ???
[|||||||||||||||||] A3. LEARNING \\\\\\\\\\\\\\\\\\\\\\\\\\\\\\\\\\\\\\\\\\
(Under Construction)
A3.1: RX-8 Club Threads
-- A3.1.1: Link - "DIY: Dry CF Console Side Plate Wrap" by Vlaze
A3.2: External Forums and Websites
A3.3: Videos
A3.4: Car Wrap Training
-- A3.4.1: Feller's Wrap Training Companies.
Last edited by RogueTadhg; 08-28-2011 at 10:17 PM. Reason: Continuing To Evolve...
 08-26-2011, 11:02 PM
#2
Living is best Modified.
Thread Starter
[|||||||||||||||||] B1. Do it yourself: Part 1 - Examining the car \\\\\\\\\\\\\\\\\\\\\\\\\\\\\\\\\\\\\\\\\\
Examining the car is very important. Run your hand along the vehicle, tracing the seams of the car. Take mental notes about where the seams begin, and end. Take pictures of your car and upload them on the computer. This way you won't need to stand outside in the humid or cold air and you can do what I've done below- I know this seems excessive but keep in mind you won't be able to see the car. All of this is preparation so that when you do get the vinyl on the car, you won't be going blind. I'm writing this review as a first timer, I'm sure experienced professionals know how to lay vinyl over without taking all this time.
Trace Map 1: Side View-
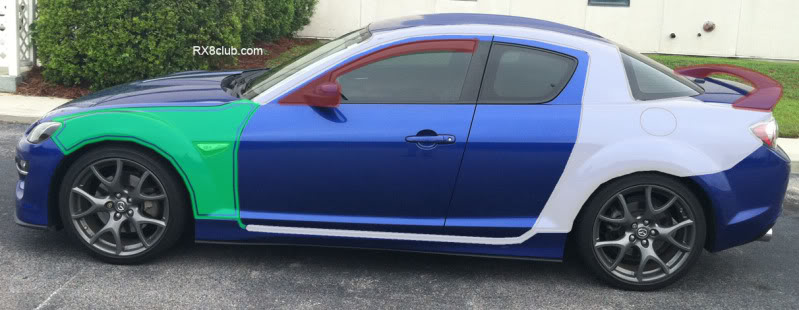
B1.1: Panel Sizes 1) From Side(FS): Long x Tall. 2) From Front(FF): Sides x front to back. (2009 Mazda RX-8 R3 Specific)
Most of the panel sizes will work for most other RX-8s in all years. But I have a 2009 R3, so it the sizes are told in that way.
-- B1.1.1: Rear Quarter Panel: 107" x 60" (FS)
-- -- B1.1.1.1: Includes Front Door, Back Door, Gas lid.
-- B1.1.2: Front Quarter Panel: 48" x 60" (FS)
-- B1.1.3: Side Skirt: 76" x 7"(FS)
-- B1.1.4: Door Handle: 10" x 2.5"(FS)
-- B1.1.5: Side Mirror: 10" x 10"(FS)
-- B1.1.6: Hood: 60" x 53" (FF)
-- B1.1.7: Front Bumper: 100" x 25"(FF)
-- B1.1.8: Rear Bumper: 133" x 24" (FF)
-- B1.1.9: Roof: 60" x 55"(FF)
-- B1.1.10: Trunk: 53" x 30" (FF)
-- B1.1.11: Spoiler: 53" x 16" (FF) [Note: The Vinyl will need to be wrapped around. I only calculated the flat dimension here]
-- B1.1.12: Visor Strip Length: 46" (Measured 8" down from the top, center)
B1.2: After all the measurements get an idea how the wrap will be done. Keep in mind that while you can stretch vinyl, it shouldn't be stretched too far.
-- B1.2.a. Horizontal wrapped: Side (2x) + Trunk + Front + Front Panels (2) + Hood + Roof + Spoiler
-- -- ● The spoiler will be wrapped so the seam is underneath. The seam will be open towards the back to help prevent lifting from wind and rain.
-- -- ● The RX-8 has a lot of curves and strange positions. I'm recommending doing panel by panel
-- B1.2.b. Math 2: The total Length: 107 + 107 + 53 + 53 + 48 + 48 + + 60 + 60 + 32 = 568" (Inches) long
-- B1.2.b. Math 3: Inches into Yard: 568 / 36 = 15.7 yard long.
[|||||||||||||||||] B2. Do it yourself: Part 2 - Vinyl Purchasing \\\\\\\\\\\\\\\\\\\\\\\\\\\\\\\\\\\\\\\\\\
Some local stores may not sell direct to consumers at retail. But most stores will point you to places where you can buy the vinyl.
B2.1: Online Stores:
-- B2.1.x. Fellers - 1 (800) 654-8405 - 7am-7pm M-F CST
-- B2.1.x. DecalFX.com - No Phone Number Available
-- B2.1.x. StickerCity - 1 (888) 972-7787
-- B2.1.x. USCutter - 1 (425) 481-3555
-- B2.1.x. BeaconGraphics.com - 1 (800) 763-9205
-- B2.1.x. AutoVinylSolutions - 1 (888) 716-1221
-- B2.1.x. TyrrellTech - 1 (888) 865-0300
-- B2.1.x. N.Glantz & Son - 1 (866) 645-2689
-- B2.1.x. SIGN Warehouse - 1 (800) 699-5512 - 7am-11pm M-F, 9am-4pm Sat, 1pm-5pm Sun CST
-- B2.1.x. Hyatt's - Buffalo, NY: 1 (800) 234-9288
B2.2: Questions you should ask yourself and others when shopping for vinyl:
-- B2.2.1. Take Measurements. Leave space around the edges of the trim to tuck in the vinyl. Will the vinyl I order cover my panels - especially my hood?
-- B2.2.2. Do I know how my car panels are laid out?
-- -- B2.2.2.1: Do you know where the have seams are?
-- -- B2.2.2.1: Did you Trace the seams on ALL of the panels - both sides, front and back. Get familiar with the layout.
-- B2.2.3. Clean Removability: How many years can the vinyl be on the car before it starts to do damage to the paint.
-- B2.2.4. Adhesive Propties: How aggressive is the adhesive on the vinyl? Application temperatures?
-- -- B2.2.4.a: The more aggressive the adhesives (stickier) the vinyl, the more likely of paint damage.
-- B2.2.5. Thickness: 2 mil or 4 mil? The thickness determines the total workability. You'll get an easier application with thinner vinyl. Easier to get to round curves. Easier to push into form. Easier to cut. Harder to use vinyl leads to car damage - rubber, plastic or paint.
-- B2.2.6. Lamination: This is the protective "Clear coat" for vinyl. Has lamination been applied on the vinyl? Liquid, Layered, Non at all?
-- B2.2.7. Car Body shape: Do you have spoilers, aftermarket body kits, accessories? All of these items will make a seamless application hard. It may be a good idea to uninstall these items as it will cause difficulties.
-- B2.2.9. Installation Instructions.
-- -- B2.2.9.1: Wet or Dry installation. Do you use liquid to apply?
-- B2.2.10. Removing the Vinyl. Most sellers will have educated people to tell you about the products they sell. Removing the vinyl is just as important as putting it on.
-- B2.2.11. Ink Type: Solvant-Based > UV Cureable (Not as conformable and more likely to crack) > Water-based Ink (Fades quicker)
-- B2.2.12. Primer: Helps with making the vinyl stay around odd shapes.
-- B2.2.13. Heat: The usual rule is 200 F. Check with the manufacturer if unsure. Warning: Matte finishes can be made shiny with too much heat.
B2.3: Shipping and handling
-- B2.3.1: Shipping a 60" x 1 yd cost $17 in my state. The vinyl itself: $30. 61% of the subtotal is shipping.
-- B2.3.2: The box does fit inside the RX-8. In the back seat, between the seat the pocket can be removed and an opening to the truck is available. Guess where the Vinyl box fits - perfectly. That's right. No truck needed!
[|||||||||||||||||] B3. Do it yourself: Part 3 - Tools \\\\\\\\\\\\\\\\\\\\\\\\\\\\\\\\\\\\\\\\\\
All things take tools. You need tools to cook, clean a gun, chop down trees, drink beer and in some places of Las Vegas: to have sex. Wrapping your car should not be any different. The proper tools can be exchanged with widely-kept home supplies, but like anything using what the professionals use and use a lot makes all the difference in how easy a job gets done, how it looks after, and how it lasts. I've also separated each tool into categories, feel free to swap catagories with what you have and what you want.
Have another person (Better yet: Two) to help you pull the large pieces of vinyl taut against the car is important... However, this is a a DIY. Not a "Do it with 2 people". Doing it myself and not having anyone's help is a personal requirement, and I'll show how you can do this yourself - as much as possible
B3.1 Tools: Beginners (Basic)
-- (Prep) - Clean Car: Wash. No Wax. Full Rubbing Alcohol (70% Isopropyl) Wipe down.
-- (Press) - Credit Card.
+ Wrapped in clean Micro Fiber cloth.
-- (Fluid) - Soapy Water in a clean spray bottle. Lubrication for the Vinyl. [color=red]Must NOT contain any ammonia[/b]. Optional, See Vinyl Manufacturer's instructions.
-- (Heat) - Hair Dryer.
-- (Cut) - Box Cutter.
-- (Stablize) - Masking tape
-- (Poke) - New Needle.
-- (Temp Ctrl) - Night Time or Shade.
-- (Comfort) - A desk chair.
-- (Essentials) - Patience and Time
B3.2 Tools: The Do it yourselfer (InterMediate)
-- (Prep) - Clean Car: Wash. No Wax. Rubbing Alcohol (70% Isopropyl) Wipe down.
-- (Prep #2) - Primer. Promote better adhesion around complex shapes. (IE: Pro Bond Adhesive Promoer)
-- (Press) - Felt Squeegee.
-- (Press #2) - Clean Micro Fiber Cloth. So you don't poke a hole.
-- (Fluid) - Application Fliud. Lubrication for the Vinyl. [color=red]Must NOT contain any ammonia[/b]. Optional. See Vinyl Manufacturer's instructions
-- (Heat) - Heat Gun.
-- (Cut) - X-Acto Knife with breakoff blades. (You will be changing blades often to make sure that the vinyl does not rip or tear.)
-- (Stablize) - Blue Painter's Tape.
-- (Poke) - Needle
-- (Temp Ctrl) - A Garage. The Cleaner the better.
-- (Temp Ctrl #2) - Temperature around 65�F-75�F
-- (Comfort) - Old Computer Chair with wheels.
-- (Essentials) - More Patience and More Time
B3.3 Tools: Professional (Expert)
-- (Prep) - Clean car: Wash. No Wax. Rubbing Alcohol (70% Isopropyl) Wipe down.
-- (Prep #2) - Adhesion Promoters.
-- (Press) - Felt Squeegee.
-- (Press #2) - Heat resistant gloves.
-- (Fluid) - Soapy Water. Lubrication for the Vinyl. [color=red]Must NOT contain any ammonia[/b]. Optional. See Vinyl Manufacturer's instructions
-- (Heat) - Torch & Propane Cylinder. Quick, Reliable, consistant heat.
-- (Cut) - Cartridge Cutter A-551P. It allows for a shallow cut. The Chasis of the cutter is wider, allowing the cut to be guided by the seams on a car.
-- (Stablize) - Magnets. No Residue worries.
-- (Poke) - Air Release Tool. Specialized tool for releasing air bubbles.
-- (Fluid) - Application Fliud. Lubrication for the Vinyl. [color=red]Must NOT contain any ammonia[/b]. Optional. See Vinyl Manufacturer's instructions
-- (Longevity) - Edge Sealer. Helps to prevent edge lifting. Found in Optic Clear tape, pens, and liquid.
-- (Temp Ctrl) - A Garage. The Cleaner the better.
-- (Temp Ctrl #2) - Temperature around 65�F-75�F.
-- (Temp Ctrl #3) - IR Temperature Gun.
-- (Comfort) - Garage chair with wheels, and a tray to hold tools.
-- (Essentials) - A lot more Patience and A lot more Time. Experience.
B3.4 Tools: My Tools (Ghetto) - Note, I do NOT have shade or a garage, so temperature control is especially difficult for me.
-- Blue Bucket of 5 gallons of Water with 2 drops of dawn. 70% Isopropyl Alcohol in a spray bottle.
-- Old Bank card w/ New MicroFiber Cloth. Not using. Awkward to work in positions with Vinyl. Purchasing a Squeegee instead.
-- No Application fluid needed for this vinyl
-- Milwauke Heat Gun. No attachments. 2x Extension cords (Really, I should just buy one really long one)
-- Blue Painter's Tape, Magnetics "Pro Wrap Mags"
-- 1 pair Wrap Gloves
[|||||||||||||||||] B4. Do it yourself: Part 2 - Car Preparation \\\\\\\\\\\\\\\\\\\\\\\\\\\\\\\\\\\\\\\\\\
All right! So we've gathered our materials. We're going to start to put vinyl on the car.
Step B4: Preparation Check list
-- B4.1: Try to repair the paint as best as possible. Deep scratches and blemishes will show up on the final outcome.
-- B4.2: Wash, Clay Bar. Absolutely NO wax.
-- -- ● Avoid normal car shampoos that create a "Shiny" exterior. These products and Waxes can burn, causing adhesive issues down the road. Use a drop of dish detergent
-- B4.3: Optional, Remove: Side Mirrors, Spoiler, Emblems, Fog/Tail lights, Side Window Deflectors, License Plates, Front Lip Spoiler, Side Skirt.
-- B4.4: Prepare Alcohol in a clean spray bottle with a clean microfiber cloth
-- B4.4: With the IR gun: Check the surface temp of the paint. Make sure it's between 65�F-75�F. Too cold and the Vinyl will be brittle, too warm and the adhesive will not stay put as well.
Examining the car is very important. Run your hand along the vehicle, tracing the seams of the car. Take mental notes about where the seams begin, and end. Take pictures of your car and upload them on the computer. This way you won't need to stand outside in the humid or cold air and you can do what I've done below- I know this seems excessive but keep in mind you won't be able to see the car. All of this is preparation so that when you do get the vinyl on the car, you won't be going blind. I'm writing this review as a first timer, I'm sure experienced professionals know how to lay vinyl over without taking all this time.
Trace Map 1: Side View-
B1.1: Panel Sizes 1) From Side(FS): Long x Tall. 2) From Front(FF): Sides x front to back. (2009 Mazda RX-8 R3 Specific)
Most of the panel sizes will work for most other RX-8s in all years. But I have a 2009 R3, so it the sizes are told in that way.
-- B1.1.1: Rear Quarter Panel: 107" x 60" (FS)
-- -- B1.1.1.1: Includes Front Door, Back Door, Gas lid.
-- B1.1.2: Front Quarter Panel: 48" x 60" (FS)
-- B1.1.3: Side Skirt: 76" x 7"(FS)
-- B1.1.4: Door Handle: 10" x 2.5"(FS)
-- B1.1.5: Side Mirror: 10" x 10"(FS)
-- B1.1.6: Hood: 60" x 53" (FF)
-- B1.1.7: Front Bumper: 100" x 25"(FF)
-- B1.1.8: Rear Bumper: 133" x 24" (FF)
-- B1.1.9: Roof: 60" x 55"(FF)
-- B1.1.10: Trunk: 53" x 30" (FF)
-- B1.1.11: Spoiler: 53" x 16" (FF) [Note: The Vinyl will need to be wrapped around. I only calculated the flat dimension here]
-- B1.1.12: Visor Strip Length: 46" (Measured 8" down from the top, center)
B1.2: After all the measurements get an idea how the wrap will be done. Keep in mind that while you can stretch vinyl, it shouldn't be stretched too far.
-- B1.2.a. Horizontal wrapped: Side (2x) + Trunk + Front + Front Panels (2) + Hood + Roof + Spoiler
-- -- ● The spoiler will be wrapped so the seam is underneath. The seam will be open towards the back to help prevent lifting from wind and rain.
-- -- ● The RX-8 has a lot of curves and strange positions. I'm recommending doing panel by panel
-- B1.2.b. Math 2: The total Length: 107 + 107 + 53 + 53 + 48 + 48 + + 60 + 60 + 32 = 568" (Inches) long
-- B1.2.b. Math 3: Inches into Yard: 568 / 36 = 15.7 yard long.
[|||||||||||||||||] B2. Do it yourself: Part 2 - Vinyl Purchasing \\\\\\\\\\\\\\\\\\\\\\\\\\\\\\\\\\\\\\\\\\
Some local stores may not sell direct to consumers at retail. But most stores will point you to places where you can buy the vinyl.
B2.1: Online Stores:
-- B2.1.x. Fellers - 1 (800) 654-8405 - 7am-7pm M-F CST
-- B2.1.x. DecalFX.com - No Phone Number Available
-- B2.1.x. StickerCity - 1 (888) 972-7787
-- B2.1.x. USCutter - 1 (425) 481-3555
-- B2.1.x. BeaconGraphics.com - 1 (800) 763-9205
-- B2.1.x. AutoVinylSolutions - 1 (888) 716-1221
-- B2.1.x. TyrrellTech - 1 (888) 865-0300
-- B2.1.x. N.Glantz & Son - 1 (866) 645-2689
-- B2.1.x. SIGN Warehouse - 1 (800) 699-5512 - 7am-11pm M-F, 9am-4pm Sat, 1pm-5pm Sun CST
-- B2.1.x. Hyatt's - Buffalo, NY: 1 (800) 234-9288
B2.2: Questions you should ask yourself and others when shopping for vinyl:
-- B2.2.1. Take Measurements. Leave space around the edges of the trim to tuck in the vinyl. Will the vinyl I order cover my panels - especially my hood?
-- B2.2.2. Do I know how my car panels are laid out?
-- -- B2.2.2.1: Do you know where the have seams are?
-- -- B2.2.2.1: Did you Trace the seams on ALL of the panels - both sides, front and back. Get familiar with the layout.
-- B2.2.3. Clean Removability: How many years can the vinyl be on the car before it starts to do damage to the paint.
-- B2.2.4. Adhesive Propties: How aggressive is the adhesive on the vinyl? Application temperatures?
-- -- B2.2.4.a: The more aggressive the adhesives (stickier) the vinyl, the more likely of paint damage.
-- B2.2.5. Thickness: 2 mil or 4 mil? The thickness determines the total workability. You'll get an easier application with thinner vinyl. Easier to get to round curves. Easier to push into form. Easier to cut. Harder to use vinyl leads to car damage - rubber, plastic or paint.
-- B2.2.6. Lamination: This is the protective "Clear coat" for vinyl. Has lamination been applied on the vinyl? Liquid, Layered, Non at all?
-- B2.2.7. Car Body shape: Do you have spoilers, aftermarket body kits, accessories? All of these items will make a seamless application hard. It may be a good idea to uninstall these items as it will cause difficulties.
-- B2.2.9. Installation Instructions.
-- -- B2.2.9.1: Wet or Dry installation. Do you use liquid to apply?
-- B2.2.10. Removing the Vinyl. Most sellers will have educated people to tell you about the products they sell. Removing the vinyl is just as important as putting it on.
-- B2.2.11. Ink Type: Solvant-Based > UV Cureable (Not as conformable and more likely to crack) > Water-based Ink (Fades quicker)
-- B2.2.12. Primer: Helps with making the vinyl stay around odd shapes.
-- B2.2.13. Heat: The usual rule is 200 F. Check with the manufacturer if unsure. Warning: Matte finishes can be made shiny with too much heat.
B2.3: Shipping and handling
-- B2.3.1: Shipping a 60" x 1 yd cost $17 in my state. The vinyl itself: $30. 61% of the subtotal is shipping.
-- B2.3.2: The box does fit inside the RX-8. In the back seat, between the seat the pocket can be removed and an opening to the truck is available. Guess where the Vinyl box fits - perfectly. That's right. No truck needed!
[|||||||||||||||||] B3. Do it yourself: Part 3 - Tools \\\\\\\\\\\\\\\\\\\\\\\\\\\\\\\\\\\\\\\\\\
All things take tools. You need tools to cook, clean a gun, chop down trees, drink beer and in some places of Las Vegas: to have sex. Wrapping your car should not be any different. The proper tools can be exchanged with widely-kept home supplies, but like anything using what the professionals use and use a lot makes all the difference in how easy a job gets done, how it looks after, and how it lasts. I've also separated each tool into categories, feel free to swap catagories with what you have and what you want.
Have another person (Better yet: Two) to help you pull the large pieces of vinyl taut against the car is important... However, this is a a DIY. Not a "Do it with 2 people". Doing it myself and not having anyone's help is a personal requirement, and I'll show how you can do this yourself - as much as possible
B3.1 Tools: Beginners (Basic)
-- (Prep) - Clean Car: Wash. No Wax. Full Rubbing Alcohol (70% Isopropyl) Wipe down.
-- (Press) - Credit Card.
+ Wrapped in clean Micro Fiber cloth.
-- (Fluid) - Soapy Water in a clean spray bottle. Lubrication for the Vinyl. [color=red]Must NOT contain any ammonia[/b]. Optional, See Vinyl Manufacturer's instructions.
-- (Heat) - Hair Dryer.
-- (Cut) - Box Cutter.
-- (Stablize) - Masking tape
-- (Poke) - New Needle.
-- (Temp Ctrl) - Night Time or Shade.
-- (Comfort) - A desk chair.
-- (Essentials) - Patience and Time
B3.2 Tools: The Do it yourselfer (InterMediate)
-- (Prep) - Clean Car: Wash. No Wax. Rubbing Alcohol (70% Isopropyl) Wipe down.
-- (Prep #2) - Primer. Promote better adhesion around complex shapes. (IE: Pro Bond Adhesive Promoer)
-- (Press) - Felt Squeegee.
-- (Press #2) - Clean Micro Fiber Cloth. So you don't poke a hole.
-- (Fluid) - Application Fliud. Lubrication for the Vinyl. [color=red]Must NOT contain any ammonia[/b]. Optional. See Vinyl Manufacturer's instructions
-- (Heat) - Heat Gun.
-- (Cut) - X-Acto Knife with breakoff blades. (You will be changing blades often to make sure that the vinyl does not rip or tear.)
-- (Stablize) - Blue Painter's Tape.
-- (Poke) - Needle
-- (Temp Ctrl) - A Garage. The Cleaner the better.
-- (Temp Ctrl #2) - Temperature around 65�F-75�F
-- (Comfort) - Old Computer Chair with wheels.
-- (Essentials) - More Patience and More Time
B3.3 Tools: Professional (Expert)
-- (Prep) - Clean car: Wash. No Wax. Rubbing Alcohol (70% Isopropyl) Wipe down.
-- (Prep #2) - Adhesion Promoters.
-- (Press) - Felt Squeegee.
-- (Press #2) - Heat resistant gloves.
-- (Fluid) - Soapy Water. Lubrication for the Vinyl. [color=red]Must NOT contain any ammonia[/b]. Optional. See Vinyl Manufacturer's instructions
-- (Heat) - Torch & Propane Cylinder. Quick, Reliable, consistant heat.
-- (Cut) - Cartridge Cutter A-551P. It allows for a shallow cut. The Chasis of the cutter is wider, allowing the cut to be guided by the seams on a car.
-- (Stablize) - Magnets. No Residue worries.
-- (Poke) - Air Release Tool. Specialized tool for releasing air bubbles.
-- (Fluid) - Application Fliud. Lubrication for the Vinyl. [color=red]Must NOT contain any ammonia[/b]. Optional. See Vinyl Manufacturer's instructions
-- (Longevity) - Edge Sealer. Helps to prevent edge lifting. Found in Optic Clear tape, pens, and liquid.
-- (Temp Ctrl) - A Garage. The Cleaner the better.
-- (Temp Ctrl #2) - Temperature around 65�F-75�F.
-- (Temp Ctrl #3) - IR Temperature Gun.
-- (Comfort) - Garage chair with wheels, and a tray to hold tools.
-- (Essentials) - A lot more Patience and A lot more Time. Experience.
B3.4 Tools: My Tools (Ghetto) - Note, I do NOT have shade or a garage, so temperature control is especially difficult for me.
-- Blue Bucket of 5 gallons of Water with 2 drops of dawn. 70% Isopropyl Alcohol in a spray bottle.
-- Old Bank card w/ New MicroFiber Cloth. Not using. Awkward to work in positions with Vinyl. Purchasing a Squeegee instead.
-- No Application fluid needed for this vinyl
-- Milwauke Heat Gun. No attachments. 2x Extension cords (Really, I should just buy one really long one)
-- Blue Painter's Tape, Magnetics "Pro Wrap Mags"
-- 1 pair Wrap Gloves
[|||||||||||||||||] B4. Do it yourself: Part 2 - Car Preparation \\\\\\\\\\\\\\\\\\\\\\\\\\\\\\\\\\\\\\\\\\
All right! So we've gathered our materials. We're going to start to put vinyl on the car.
Step B4: Preparation Check list
-- B4.1: Try to repair the paint as best as possible. Deep scratches and blemishes will show up on the final outcome.
-- B4.2: Wash, Clay Bar. Absolutely NO wax.
-- -- ● Avoid normal car shampoos that create a "Shiny" exterior. These products and Waxes can burn, causing adhesive issues down the road. Use a drop of dish detergent
-- B4.3: Optional, Remove: Side Mirrors, Spoiler, Emblems, Fog/Tail lights, Side Window Deflectors, License Plates, Front Lip Spoiler, Side Skirt.
-- B4.4: Prepare Alcohol in a clean spray bottle with a clean microfiber cloth
-- B4.4: With the IR gun: Check the surface temp of the paint. Make sure it's between 65�F-75�F. Too cold and the Vinyl will be brittle, too warm and the adhesive will not stay put as well.
Last edited by RogueTadhg; 08-27-2011 at 10:56 PM. Reason: ...
08-26-2011, 11:08 PM
#5
Living is best Modified.
Thread Starter
::::::::: Edits:
8/27/2010: Upgrading to a squeegee. Working a card wrapped microfiber cloth is bulky. Purchased a 93% Iso. Alcohol and a cheap spray in any direction bottle from Kmart
8/28/2010: Bought a Squeegee & Break off Box cutter at O'Reily's (Beside the tint section). Purchased head LED lamp to see better at night from LOWES. Made my first attempt.
Last edited by RogueTadhg; 08-28-2011 at 08:10 PM.

The following users liked this post:
Rx8_enthusiast_2004 (03-26-2022)
 08-28-2011, 08:18 PM
#10
Living is best Modified.
Thread Starter
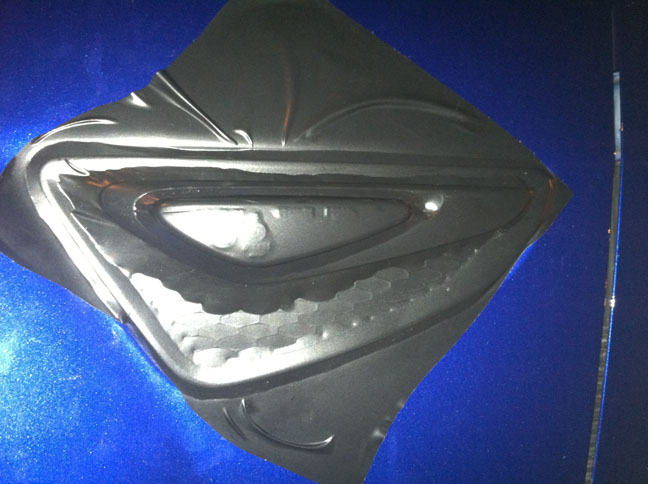
Firsties.
So I've just spent an hour working on this small section. Mostly trying to heat, push, reheat push harder and.. well.. it didn't quite mold into the concave section as I'd like it to.
I'm going to scratch this up as a "Need Primer". Note, I did wash the entire car, as well as cleaned the area with alcohol before trying.
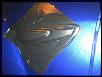

The last two pictures you can see where I've tried to force the vinyl into position with my squeegee.
Tip: Don't just push the vinyl in the center. With a squeegee, run into the pulled up area to maintain a less wrinkled look.
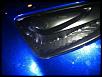
- Also note where my cutting was far too deep and scratched the paint. I won't be using the LOWES giantic break off cutter. I'll be using the included cheap yellow cutter that came with the squeegee for now on. (Paint Damage)
- I'll need to buy some type of heat resistant gloves because.
- After trial and error I've found if my heatgun is set to 300 degrees, and place it about 4 inches off the vinyl is the quickest way - I didn't invest in a butane torch
- Small bubbles may be pushed out, the vinyl i've chosen as my sample is "Oracle 970 RA". But stubbornly, i'll need a needle to puncture the last thin bubbles.
Oh yeah. I'm going to need to cut out these yolk-like look in the side indicators!
I'm going to scratch this up as a "Need Primer". Note, I did wash the entire car, as well as cleaned the area with alcohol before trying.

The last two pictures you can see where I've tried to force the vinyl into position with my squeegee.
Tip: Don't just push the vinyl in the center. With a squeegee, run into the pulled up area to maintain a less wrinkled look.

- Also note where my cutting was far too deep and scratched the paint. I won't be using the LOWES giantic break off cutter. I'll be using the included cheap yellow cutter that came with the squeegee for now on. (Paint Damage)
- I'll need to buy some type of heat resistant gloves because.
- After trial and error I've found if my heatgun is set to 300 degrees, and place it about 4 inches off the vinyl is the quickest way - I didn't invest in a butane torch
- Small bubbles may be pushed out, the vinyl i've chosen as my sample is "Oracle 970 RA". But stubbornly, i'll need a needle to puncture the last thin bubbles.
Oh yeah. I'm going to need to cut out these yolk-like look in the side indicators!
Last edited by RogueTadhg; 08-28-2011 at 08:46 PM.
08-31-2011, 08:29 AM
#13
Living is best Modified.
Thread Starter
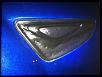
I thought about going from top to bottom, instead of what I was doing - bottom to top.
In this case, squeegeeing the indicator light, and working around that. So that I don't have a case where I'd be trying to force it into place.
Also, i came across using a suqeegee to flatten and using the knife to cut and tuck. I haven't been able to get back out at night unfortantly
In this case, squeegeeing the indicator light, and working around that. So that I don't have a case where I'd be trying to force it into place.
Also, i came across using a suqeegee to flatten and using the knife to cut and tuck. I haven't been able to get back out at night unfortantly
09-13-2011, 06:26 PM
#14
Living is best Modified.
Thread Starter
Update: I need to put this project on pause. Indefinitely, for how long, I don't know.
I went to the Emergency Room last sunday with a fever of a 104 degrees. Long story short- I just called the hospital to see about my bill.
The bill: $4041.73
Needless to say, I need to make sure that this is taken care of before anything else happens.
I went to the Emergency Room last sunday with a fever of a 104 degrees. Long story short- I just called the hospital to see about my bill.
The bill: $4041.73
Needless to say, I need to make sure that this is taken care of before anything else happens.
09-21-2011, 03:30 PM
#15
EveryonesFavouritePenguin
iTrader: (2)

Join Date: Dec 2009
Location: Stoney Creek, Ontario
Posts: 151
Likes: 0
Received 0 Likes
on
0 Posts
I hope you're alright, dude.
so I skimmed through your posts, and you wrote that you spent only 30 bucks on the actual vinyl.
Where did you get this, exactly?
so I skimmed through your posts, and you wrote that you spent only 30 bucks on the actual vinyl.
Where did you get this, exactly?
02-26-2012, 07:16 AM
#16

I hope you are well. I joined this forum because I came across this thread. I hope you still can find the time to finish it, because I would like to learn moer especially about car wrapping.
 12-04-2012, 11:51 PM
#18
Registered User

Join Date: Jan 2012
Posts: 2
Likes: 0
Received 0 Likes
on
0 Posts
i wrapped my trunk, roof, front grille, foglight housing, my b-pillar and rear bumper trim with R60 carbon fiber vinyl from Rvinyl.com i only purchased 120" by 60" and i still have some left over (not enough to do anything major though)
it was pretty easy, i only needed help with the roof and trunk.. i did everything else myself, it is time consuming to do it yourself, but you gotta stay patient
all you need is a small rag, rectangle preferrably plactic around the size of an ID card or Debit card.. just more sturdy.. hairdryer or heat gun.. and a little bit of muscle..
you can watch tutorials on youtube or Rvinyl.com
alot of people say it looks rice but i dont care, you dont have to worry about the clear separating from the carbon fiber like you do with genuine carbon fiber... ive had the vinyl on now for a year and it still looks great..
and you can keep it in excellent condition using Adams VRT dressing.. it has SPF 15 in it to protect it from the sun and keeps the carbon vinyl looking glossy
I imagine that wrapping the whole car wouldnt be that much more difficult.. you just have to take it easy with 90 degree angles like the bend of the trunk.. (deffinitely the hardest part i did)
hope this helps!!!
02-15-2013, 10:56 AM
#19
Registered User

Join Date: Feb 2013
Posts: 1
Likes: 0
Received 0 Likes
on
0 Posts
I work for a Vinyl supplier. Just wanted to put some extra info here.
Under terminology:
Weeding: ???
Weeding is removing the vinyl out of cut out ares that you do not want to have there. Usually after the vinyl is cut with a plotter.
Vinyl Types:
Intermediate / Calendared - A short term vinyl. This vinyl is made by an extrusion process. Not to be used for wrapping. Stretchablity is very limited, used mostly for Indoor applications. Longterm this vinyl has a "memory" and will shrink back onto its self. 1-5 years
High performance: A long term Vinyl. This is a CAST vinyl and does not have a "memory" 5-9 years.
Also you want to make sure you use an over laminate on any wrap job. Especially if you have printed graphics. The over laminate offers some UV protection and will give you a Finish ( Gloss, Matte, Luster, etc.)
Other things to know:
Check what kind of adhesive your vinyl has. Water Based ( not recommended for wrap) Or Solvent Based.
Water based you can not " Wet apply" your vinyl, making it more difficult to apply.
Wet apply means using the soap solution, this allows you to float the vinyl and get it into position easier. it also allows you to push air bubbles out easier. You can also use premade products for a more consistent formula like RapidTac.
Also other options for ease of install would be 3M's ControlTac, and Air release.
Control Tac (offered by Oracal under a different name) makes re positionablitiy easier. Air release (offered in many brands) is very small channels in the adhesive to allow the air to be pushed out easier.
Also under Tools:
You should add a Rivet Brush.
I ran across this by looking into how to do wrapping as I know my material but not all of the processes involved with application such as how to stretch, manipulate and finish the vinyl.
08-05-2013, 02:59 PM
#20
New Member

Join Date: Aug 2013
Posts: 1
Likes: 0
Received 0 Likes
on
0 Posts
solution
Its actually insanely hard to vinyl wrap a car, and very expensive too. But I found out about this supplier called vvivid vinyls and their material is just as easy to work with as 3M, except around half the price. They also post detailed step by step instructions, tips and videos on how to wrap a car VViViD Vinyl.
08-06-2013, 01:35 PM
#21
Yellow looks faster.
iTrader: (1)

Join Date: Jun 2012
Location: North NJ - Utah - Arizona
Posts: 445
Likes: 0
Received 0 Likes
on
0 Posts
i wrapped my trunk, roof, front grille, foglight housing, my b-pillar and rear bumper trim with R60 carbon fiber vinyl from Rvinyl.com i only purchased 120" by 60" and i still have some left over (not enough to do anything major though)
it was pretty easy, i only needed help with the roof and trunk.. i did everything else myself, it is time consuming to do it yourself, but you gotta stay patient
all you need is a small rag, rectangle preferrably plactic around the size of an ID card or Debit card.. just more sturdy.. hairdryer or heat gun.. and a little bit of muscle..
you can watch tutorials on youtube or Rvinyl.com
alot of people say it looks rice but i dont care, you dont have to worry about the clear separating from the carbon fiber like you do with genuine carbon fiber... ive had the vinyl on now for a year and it still looks great..
and you can keep it in excellent condition using Adams VRT dressing.. it has SPF 15 in it to protect it from the sun and keeps the carbon vinyl looking glossy
I imagine that wrapping the whole car wouldnt be that much more difficult.. you just have to take it easy with 90 degree angles like the bend of the trunk.. (deffinitely the hardest part i did)
hope this helps!!!
it was pretty easy, i only needed help with the roof and trunk.. i did everything else myself, it is time consuming to do it yourself, but you gotta stay patient
all you need is a small rag, rectangle preferrably plactic around the size of an ID card or Debit card.. just more sturdy.. hairdryer or heat gun.. and a little bit of muscle..
you can watch tutorials on youtube or Rvinyl.com
alot of people say it looks rice but i dont care, you dont have to worry about the clear separating from the carbon fiber like you do with genuine carbon fiber... ive had the vinyl on now for a year and it still looks great..
and you can keep it in excellent condition using Adams VRT dressing.. it has SPF 15 in it to protect it from the sun and keeps the carbon vinyl looking glossy
I imagine that wrapping the whole car wouldnt be that much more difficult.. you just have to take it easy with 90 degree angles like the bend of the trunk.. (deffinitely the hardest part i did)
hope this helps!!!


Thread
Thread Starter
Forum
Replies
Last Post
JimmyBlack
Series I Major Horsepower Upgrades
273
02-10-2020 10:23 PM
yurcivicsux
Series I Major Horsepower Upgrades
192
09-12-2017 10:54 PM